After years of waffling, I made a decision that it was time to replace my workspace to be extra pleasant to on-camera work, opinions, tutorials, product images, podcasting, and many others. As a substitute of getting an area that I generally use for work, generally for research and leisure, and generally for modifying, I made a decision to change it up and wholly dedicate it to video and photograph manufacturing.
This setup is primarily powered by a 14-inch MacBook Professional linked to a single Thunderbolt cable. It’s additionally made doable by a complete host of software program, together with MovieRecorder, an expensive however improbable software from Softron. MovieRecorder permits me to concurrently report high-quality HEVC-encoded video in a multi-cam setup from a number of cameras on to my laptop, bypassing SD Playing cards of CFexpress playing cards completely.
As you’ll see in my hands-on video, I’ve performed many different issues to customise my setup for productiveness, and I hope you discover it enlightening and enjoyable. Remember to subscribe to 9to5Mac on YouTube for extra movies like this.
My Desk Setup
On the heart of my setup is the aforementioned 14-inch MacBook Pro featuring an M1 Max chip, and 32GB of RAM. This machine continues to impress me with how completely succesful it’s. As a result of it’s an M1 Max chip, it has sufficient energy and video encoding functionality to make for a rock-solid centerpiece to my setup.
The 512GB of configured storage isn’t perfect, however since MovieRecorder can encode in HEVC, the storage restrict is a lot much less of a problem than if I had been working with ProRes-encoded video. I plan to improve to a 16-inch MacBook Professional ultimately, and I’ll configure extra storage then, however my present machine has carried out so nicely that I haven’t felt rushed.
Video: Jeff’s 2024 multi-cam house studio tour
Subscribe to 9to5mac on YouTube for more videos
I offered my Professional Show XDR, a staple of my setup since early 2020, and picked up a Studio Display. I miss the HDR capabilities of the Professional Show XDR, however the smaller measurement and added performance of the Studio Show make it higher for my small workspace.
My MacBook Professional and Studio Show relaxation on a Husky mobile workbench from House Depot. This 52-inch workbench features a wooden desktop and two drawers beneath. The drawers are instrumental to my setup, nevertheless, I wanted to take away the highest drawer with the intention to match every thing inside. This additionally permits me to retailer gadgets just like the Rode Rodecaster Duo Integrated Production Studio, and rapidly entry the good pads with out even opening the drawer.
The Husky workbench options 4 high-quality casters, so I can rapidly transfer it round and reconfigure my capturing house. The bench can be top adjustable, though it’s the guide selection that includes a hand-crank.
One other desktop staple is the Elgato Wave Mic Arm LP microphone arm with a Shure SM7dB hooked up. The Elgato Wave is a surprisingly well-built and succesful arm that prices simply $99, and it’s excellent for on-camera work on account of its low-profile nature.
The Shure SM7dB sounds improbable, and its non-boosted iteration, the common SM7B, is the de facto normal for podcasting. I’ve opinions of the SM7dB and the Rodecaster Duo within the works. The Rode interface is an insanely succesful all-in-one manufacturing studio that options highly effective pre-amps, good pads for sound results and midi, and a ridiculous quantity of connectivity choices.
The Rodecaster Duo may even route audio from one or two Macs, and route audio from particular apps. And sure, you’ll be able to even join it on to your iPhone 15 Professional by way of USB-C, and interface with the audio coming from it. The Rodecaster Duo is by far one in every of my favourite merchandise in my setup, and I haven’t even began to scratch the floor of what I can do with it.
Though I exploit the increase arm for podcasting, I take pleasure in utilizing the Rode Wireless Pro lapel microphone for opinions, unboxings, and many others. The Rode Wi-fi Professional is an especially succesful microphone that sounds nice. And since the wi-fi mics can join on to the Rodecaster Duo, it makes utilizing one or each wi-fi transmitters much more seamless.
Sidenote: On my recent trip to Vegas for NAB, I put the Rode Wi-fi Professional to the check within the subject, and I used to be amazed on the efficiency. That is simply the most effective lapel mics I’ve ever used, and it has absurdly good ambient noise rejection. You possibly can watch the complete video right here:
Additionally inside my Husky Workbench is the Elgato Stream Deck + controller, which I exploit solely to regulate the Elgato Prompter that’s hooked up to my A-cam used for speaking head photographs. The knobs on the Elgato Stream Deck + are perfect for scrubbing again and ahead via a script, altering the velocity of the teleprompter, and even adjusting the show brightness.
For headphones, I exploit the super-flexible Shure AONIC 50 Gen 2 wireless headphones. Though I exploit AirPods Pro 2 primarily, once I want direct audio monitoring, the AONIC 50 is my go to. The AONIC 50 can be utilized wirelessly by way of Bluetooth, but in addition options high-resolution USB-C audio functionality. Extra importantly, they’ll even be used with a conventional 3.5mm headphone jack, and that’s how I’ve these linked to my Rodecaster Duo for monitoring voiceovers. I’ve a evaluation of those headphones within the works, so keep tuned.
A Single Thunderbolt cable
It took some time, however the USB-C Thunderbolt cable now lives as much as the guarantees initially laid out in the course of the 2016 MacBook Professional refresh launch. We had been promised a single cable to supply energy, hook up with peripherals, and even drive shows. Accent makers took just a few years to get on board, however now we have now an enormous array of Thunderbolt-enabled merchandise.
Linked to my MacBook Professional is a single 3-meter Thunderbolt Cable from Apple. This cable is expensive, however it’s exceptionally nicely constructed and lengthy sufficient that I can rapidly transfer my MacBook Professional round on my desk, and even transfer it off the desktop, and work from my sofa whereas sustaining connectivity. A second 3-meter Thunderbolt cable connects one in every of my hub interfaces to a different Thunderbolt-enabled interface, which makes the entire setup work.
With only a single Thunderbolt connection to my MacBook Professional, I’m in a position to connect with the next gadgets:
These connections are made doable by a number of extra {hardware} gadgets in between, together with:
(Full disclosure: I’m a CalDigit ambassador and generally make paid content material for CalDigit independently of 9to5Mac.)
Contained in the OWC Mercury Helios 3S exterior PCIe enclosure is the Blackmagic Design DeckLink Quad HDMI Recorder. The DeckLink Quad, as its title alludes to, options 4 HDMI inputs on a single interface, permitting me to attach as much as 4 Sony FX30 cameras concurrently. Sadly, the cardboard’s inventory fan is tremendous loud, so I changed the inventory warmth sync, which vastly helped.
Sony FX30
I selected the Sony FX30 as my primary digital camera for numerous causes. The largest cause is that they’re comparatively cheap, contemplating their spectacular capabilities.
The FX30 is the Super35 model of the favored full-frame FX3. It’s inferior to the FX3 in low-light eventualities, however I’ve loads of mild in my managed setting. The FX30 is a wildly-capable digital camera for its asking worth, and it’s hands-down the most effective values in cameras I’ve ever seen.
Two FX30s are “completely” mounted in such a approach that avoids utilizing typical stands, and thus saves treasured flooring house. I mounted an FX30 on an Impact Wall-Mounted Boom Arm for my overhead digital camera. These increase arms are completely put in and might rapidly elevate and pivot. The overhead digital camera resides immediately over my Husky cellular workbench and works nice for product showcases and detailed unboxing movies.
Connected to the overhead FX30 is a Sony E PZ 18-105mm f/4 G OSS lens. At f4, this energy zoom lens isn’t the quickest, however its vary and energy zooming capabilities are exhausting to beat. This lens lets me rapidly zoom out to seize a large shot, say, a large product unboxing, whereas additionally letting me zoom in to seize element.
Two extra cameras reside immediately in entrance of my workbench. The primary digital camera, mounted to the wall above the tv, is devoted to on-camera speaking headshots. This FX30 is paired with a Sony FE 35mm f/1.4 GM lens, which offers a roughly 50mm angle of view after the crop issue is taken under consideration.
Connected to the entrance of the 35mm lens is the Elgato Prompter, a superb teleprompter that Elgato just lately launched. I’ve lengthy tried to make use of iPad and iPhone-based teleprompter options, however I a lot choose to make use of a devoted resolution. It’s only a a lot easier and cleaner resolution and for essentially the most half it simply works.
Beneath the speaking head digital camera, mounted on a tripod, is one other FX30. I exploit this digital camera for detailed product photographs on the desktop. A easy Sony FE 50mm f/1.8 lens is hooked up to this digital camera.
The ultimate FX30 is my so-called “floating” digital camera. Generally, I exploit it handheld; generally, I connect it to a gimbal; different instances, I mount it to a tripod. I exploit this digital camera to seize every thing else the mounted cameras can’t, and usually don’t have it rigged to my multi-cam setup, though I can with a easy HDMI connection.
Setup routing {hardware}
The Thunderbolt cable linked to my MacBook Professional goes on to the upstream port of the OWC Thunderbolt Hub, which is mounted on the again of my Husky cellular workbench. The 8TB SSD (additionally mounted on the bench), Professional Show XDR are all linked to this hub.
Moreover, I’ve the CalDigit SOHO Dock linked the OWC Thunderbolt Hub, which offers me with just a few extra crucial ports. The SOHO Dock can be mounted to the again of my workbench, and it have it linked to the Rodecaster Duo, which is linked to the Shure SM7dB, and the Rode Wi-fi Professional TX. One of many superior issues concerning the Rodecaster Duo is that it permits for a direct connection to at least one or two of the Rode Wi-fi Professional transmitters, which makes it tremendous simple to seize audio for speaking head photographs or for sound design.
This setup makes it in order that I can preserve connections to essential parts just like the microphones, exterior drive, and exterior show whereas being disconnected from the opposite parts of my studio setup that join my cameras.
The second 3-meter Thunderbolt 3 cable in my setup goes from a port on the OWC Thunderbolt Hub to the uplink port on the CalDigit Thunderbolt 4 Aspect Hub. I had some points with handshaking when waking up my MacBook, and I discovered that introducing the CalDigit hub into the combination eradicated the handshaking points and made it in order that I may extra simply power-cycle the hub to get every thing again on-line if wanted.
The Sonnet Echo 20 Thunderbolt 4 Superdock and the OWC Mercury Helios 3S every hook up with a separate port on the CalDigit Thunderbolt 4 Aspect Hub, finishing the routing.
The Sonnet Echo 20 Thunderbolt 4 Superdock is a improbable piece of {hardware} for the sheer quantity of ports it means that you can entry from a single interface. It incorporates a 2.5Gb Ethernet port, which I’ve linked to my AT&T fiber connection. This offers my MacBook Professional with blazing-fast add and obtain speeds, which is particularly helpful when importing giant movies to YouTube and for stay streaming to YouTube with OBS.
The second, extra necessary cause I exploit the Sonnet Echo 20 Thunderbolt 4 Superdock, is that it options terrific energy supply properties that simply works. Sonnet’s dock options a number of USB ports that present constant energy to hooked up gadgets by way of USB-C. Along with connecting all of my FX30s to my MacBook Professional in order that I can management them remotely, the Sonnet Dock additionally retains all linked cameras charged, eliminating the necessity to swap batteries or, worse but, make the most of harmful dummy batteries.
Lastly, there’s the OWC Mercury Helios 3S. I put in the Blackmagic Design DeckLink Quad HDMI Recorder inside this PCIe Thunderbolt enclosure. The FX30s hook up with the DeckLink Quad by way of HDMI cables, and whereas I’m fairly unhealthy at cable administration, I’ve tried my greatest to make it look considerably presentable.
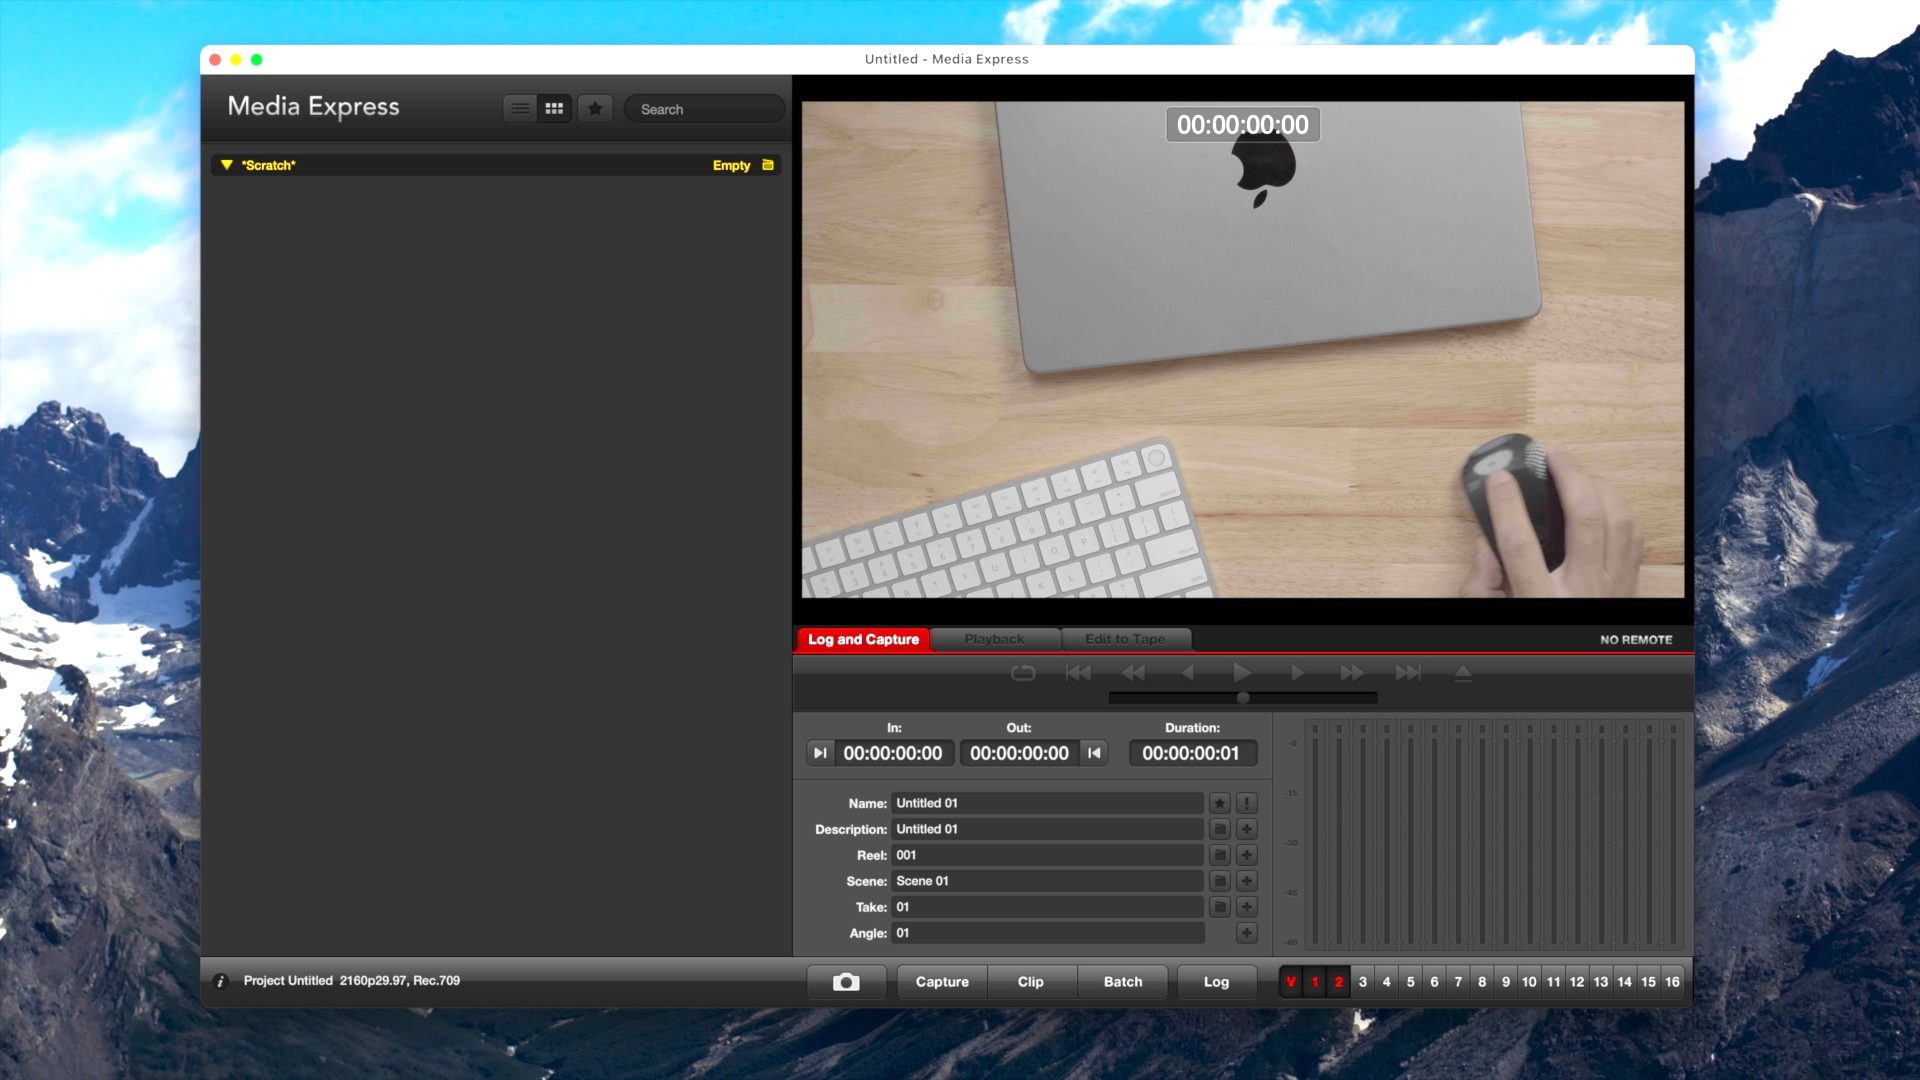
MovieRecorder – an expensive however superior multi-cam resolution
So now that we’ve gotten many of the {hardware} particulars out of the best way, the software program subject stays. How may one interface and seize video from such a fancy setup? Is it overly tough? Fortunately, a number of apps can do the job, however one stands out above the others.
Earlier than I discovered about MovieRecorder, I used Blackmagic Media Categorical to interface with my cameras by way of the DeckLink {hardware}. Sadly, Media Categorical can solely interface with a single digital camera at a time, which implies working a number of cases of the app. It really works, however it will get messy.
The larger downside with utilizing Blackmagic Media Categorical is its restricted quantity of accessible codec choices. ProRes 422 Proxy is essentially the most light-weight possibility, and people recordsdata can nonetheless get enormous. On a 512GB MacBook Professional, this rapidly poses an issue until you depend on an exterior drive. It’s not the worst downside on the planet, however even with a cavernous exterior drive, ProRes recordsdata rapidly eat up storage.
MovieRecorder solves the problems with Blackmagic Media Categorical I discussed and is healthier fitted to multi-cam environments. So long as your laptop is succesful, it could concurrently seize video from a number of cameras. Softron gave me a trial license all through my testing, letting me seize 4 inputs. Many different license choices can be found, even one that may seize as much as eight inputs, however it will get dear.


Granted, this software program is aimed toward bigger manufacturing corporations with huge budgets. Softron’s S|40 Bundle that includes 4 Film Recorder licenses on a single serial will set you again a cool €5950,00, north of $7500 USD. Once more, for a solo creator like myself, that’s most likely not going to be sensible, however there are lesser variations of Softron’s apps which might be a bit extra palatable price-wise. For example, MovieRecorder Categorical, a pared-down model of the principle app, will be had with 4 licenses for €2195 or about $2800 USD. It’s nonetheless not low-cost however way more sensible for a solo creator like myself.
The beauty of MovieRecorder is how easy and simple it makes issues. Video gadgets from Blackmagic, AJA, and NDI sources are robotically found and surfaced. It’s only a matter of clicking the checkbox subsequent to the native sources, that are instantly displayed within the viewer.


You possibly can rename sources – as an example, I’ve Speaking Head, Desk, Overhead, and Further as supply names. It’s also possible to configure particulars for every supply, like decision and body price, audio supply, and even timecode settings.
Vacation spot settings allow you to configure codec, together with super-efficient 10-bit HEVC, save location, customized naming, metadata, and extra. You possibly can even arrange AppleScripts to set off initially or finish of the recording. I really feel like I’m simply scratching the floor of what’s doable with MovieRecorder, and I may most likely make the method much more environment friendly than it already is.
Every viewer will be individually interfaced with. There are transport controls for beginning, pausing, and stopping a recording, renaming a supply, switching out a supply, or altering configured locations. It’s also possible to maximize a given supply to get a bigger view of its contents.
For multi-cam setups, MovieRecorder consists of helpful gang controls. These controls can help you concurrently begin or cease capturing footage from all enabled sources. That is super-handy for multi-cam setups as a result of it captures video from each supply with a single click on.
OBS
As a result of I can’t afford a full MovieRecorder license, I exploit OBS for all of my capturing and stay streaming capabilities. The best factor about OBS? It’s free!
OBS works nicely, is very customizable, and it has some options that I choose when in comparison with different software program. The primary subject I encountered with OBS is that it doesn’t can help you report from a number of sources directly with out a plugin, and the plugin doesn’t work very nicely in my expertise.
There are different points with OBS, and it has a a lot greater studying curve than MovieRecorder, however it’s most likely the most effective resolution for these on a funds. It’s additionally nice as a result of it could report top quality HEVC video.
I exploit the good pads on the RodeCaster Duo to regulate OBS by way of MIDI instructions interpreted by the superb BetterTouchTool utility for Mac. With a fast press of one of many pads I can simply cycle via all digital camera angles, begin and cease recording, and extra. I’ll have much more on how I exploit OBS in an upcoming submit and video.
Management
Having the ability to rapidly and effectively management this setup was crucial to me. My objective was to have as little friction as doable. Listed here are a number of the ways in which this setup removes friction.
Digital camera charging and battery administration
The FX30 incorporates a good system of battery administration and options USB PD that permits you to maintain the cameras charged by way of a USB-C cable. Every USB-C cable connects on to a port on the Sonnet Echo 20 Thunderbolt 4 Superdock, which has nice energy supply functionality. Thus, all three of my primary FX30s are all the time able to go when its time to start out filming.
Digital camera energy
I exploit a a number of good switches, such because the Eve Vitality, to energy on and energy off my cameras. For instance, the Sonnet Echo 20 Thunderbolt 4 Superdock is linked to one in every of these good switches, and I created a easy shortcut to regulate the timing of the facility with the intention to handle the linked FX30s. To activate the cameras, the shortcut appears like this.


To energy off the cameras (really placing them to sleep utilizing the FX30’s battery administration settings), the shortcut is a little more advanced to accommodate for the FX30s energy administration timing:
The objective of this shortcut was to place all linked cameras to sleep on the similar time, and likewise make it in order that the cameras would start charging as soon as they had been sleep. The FX30 won’t cost whereas awake, even when you’ve got a USB-C cable linked. Should you don’t get the timing proper, sending energy to the FX30 by way of the USB-C cable will wake the gadgets and thus forestall them from charging. It took quite a lot of guess and checking to determine the precise timing, however it works.
After the shortcuts had been configured, I then mapped them to a wise pad on the Rodecaster Duo. With a easy press of a wise pad, I can energy on or energy off all of my FX30s in a single fell swoop.
Distant controlling cameras
Sony’s wonderful Imaging Edge Desktop suite incorporates a distant tether possibility that permits you to management numerous points of the cameras by way of USB-C. That is one more profit of getting every digital camera linked to my MacBook Professional by way of the setup routing defined earlier.


I’ve a devoted desktop web page that I can swipe to that includes three cases of Sony Distant for controlling all three cameras if wanted. I don’t use distant management typically, however in sure conditions it may be helpful when it’s essential to change publicity values or change focus space.
Teleprompter
The Elgato Prompter connects to my setup by way of USB and it additionally immediately integrates with the Stream Deck + for direct management. With it, I can simply scroll ahead or backward via my script, rapidly leap between paragraphs, change font and brightness, or begin or cease scrolling by way of the knob controls on the Stream Deck +.
It’s not excellent, however having a devoted teleprompter that’s this simple to regulate has been a game-changer for my workflow, and saves tons of time. Keep tuned for the complete breakdown and evaluation.
Conclusion
That is my house studio setup in a nutshell. In fact, there are numerous different points to my setup, similar to lighting, that I haven’t touched on. Maybe I’ll save that for an additional submit and video.
The entire level of this setup was to streamline my workflow, and cut back friction as a lot as doable, and I feel it largely achieves this. There’s no juggling SD Playing cards, batteries, and many others. It’s mainly only a matter of urgent a few buttons and also you’re able to report. I’m nonetheless tinkering and making refinements, however for essentially the most half, I’m very proud of it.

As most of you realize, I’m not normally one to seem on digital camera, and like to remain behind the scenes so to talk, however this setup has made me much more comfy sitting in entrance of the digital camera.
However the greatest takeaway, for my part, is simply how versatile and succesful the MacBook Professional is. With Thunderbolt connectivity, there’s simply a lot you are able to do, and all of it works by way of a single cable connection to my Mac. After I’m completed, I can simply eject my SSD, disconnect the cable, and take my Mac with me for engaged on the go. All through all of this the MacBook Professional has carried out just about flawlessly.
What do you concentrate on my setup? Do you will have any prompt adjustments or observations? Hold forth down beneath within the feedback along with your ideas.
FTC: We use earnings incomes auto affiliate hyperlinks. More.